


When you dive into Shopify app development, you're doing more than just coding. You're creating powerful tools that help millions of merchants grow their businesses on one of the world's biggest ecommerce platforms. It’s an exciting space to be in, but it all starts with a single, clear idea: what problem are you trying to solve?
Before you even think about writing a line of code, you need to have a solid grasp of the platform itself. If you're new to the ecosystem, spending some time with a foundational overview like this What is Shopify and How Does It Work? Beginner's Guide is a great first step.
Choosing Your Development Path
Your first major decision point is whether an existing app can do the job or if you need to build something from scratch. This is a fundamental choice that sets the direction for your entire project.
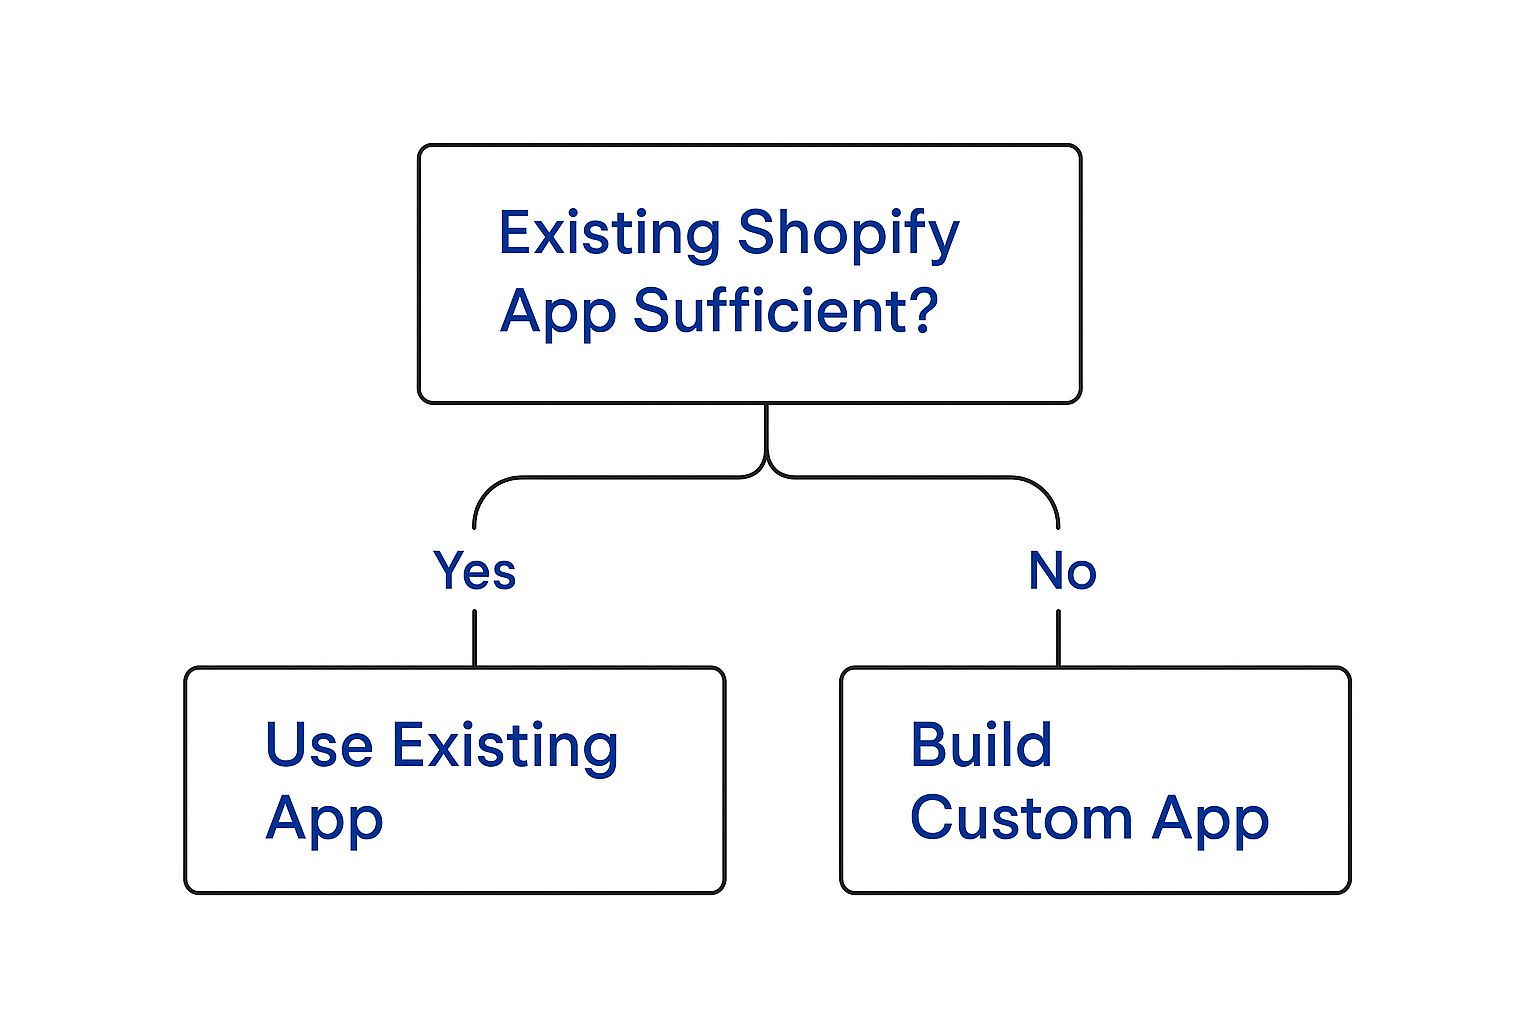
As the diagram shows, when an off-the-shelf solution just won’t cut it, custom development is the way to go. This is where you get to build a solution perfectly matched to a specific business need.
If you’ve landed on building a custom app, you have three main paths to consider. Each one serves a very different purpose, so choosing the right one is key to your success.
Choosing Your Shopify App Model
Picking the right app model is a crucial early decision that shapes everything from your development process to how you'll reach your users. This table breaks down the three core types to help you decide which path makes the most sense for your project.
App Type | Primary Use Case | Distribution Method | Ideal Developer |
|---|---|---|---|
Public App | Building a product for a wide audience of Shopify merchants. | Listed on the Shopify App Store for any store. | Entrepreneurs, SaaS companies, or developers aiming for a scalable product. |
Custom App | Creating a bespoke solution for a single client’s unique business challenge. | Not listed; installed on a specific store. | Freelancers, agencies, or consultants working directly with a single merchant. |
Private App | Developing an internal tool or integration for one specific store’s operations. | Managed from the Shopify admin; no App Store. | In-house development teams or store owners building for their own use. |
Ultimately, your choice here comes down to your goals. Are you building a product to sell to many, or are you solving a unique problem for one?
From its start as a Canadian company in 2006, Shopify has built an incredible ecosystem. Today, the app store boasts over 8,000 apps, with many coming from Canadian developers. These apps handle everything from payment gateways to sophisticated marketing automation, helping merchants keep up with major trends like the rise of mobile commerce, which is expected to account for over 54% of all ecommerce sales worldwide.
The opportunities in this space are huge. If you’re looking for expert guidance to navigate it all, you might be interested in our professional capability in Shopify development services to help get your project off the ground.
Configuring Your Development Environment
Every great Shopify app starts with a solid, well-organized workspace. Getting your local environment set up correctly is more than just a box-ticking exercise; it’s about laying the groundwork for everything that comes next. Think of it as setting up your workshop before a big project, having every tool in its place makes the actual work of coding, testing, and deploying that much smoother.
This isn't just about installing software. It's about understanding how all the pieces fit together to create a seamless workflow, from spinning up your initial app to securely managing your API keys.
Core Tools and Initial Setup
First things first, let's get the essentials installed. At the heart of any modern Shopify app is Node.js, which acts as the runtime for your JavaScript code. When you install it, you also get npm (Node Package Manager), a non-negotiable tool for handling all your project's dependencies.
With the basics out of the way, the most critical tool in your kit is the Shopify CLI. This command-line interface is your direct line to the Shopify platform, and it automates so many of the tedious setup tasks. Seriously, it lets you generate a brand-new, working app with just a single command.
The CLI takes care of a ton of heavy lifting for you:
App Scaffolding: It builds out a starter project with a pre-configured structure, complete with templates for both your frontend and backend.
Development Server: It spins up a local server to run your app and, crucially, uses a secure tunnel to connect it to Shopify so you can test it in a real store.
App Management: You can deploy your app, manage extensions, and interact with your development stores, all from the comfort of your terminal.
My Two Cents: Always keep the Shopify CLI updated. Shopify pushes out new features, bug fixes, and important security patches all the time. A quick
shopify versioncheck will tell you what you're running, andnpm install -g @shopify/cliwill get you the latest version. Trust me, it’ll save you headaches down the road.
Your Shopify Partner Account and Development Store
Before you can even touch the CLI, you need a home base for your app. That's where your Shopify Partner account comes in. It's a free account that serves as your central hub for all development work. From the Partner Dashboard, you'll manage your apps, track analytics, and eventually, handle your App Store listing.
Once you’re signed up, your next move is to create a development store. Think of this as a free, fully-functional Shopify store that’s completely sandboxed from the real world. It’s your personal playground to install, test, and debug your app without the risk of messing up a live merchant’s business. You can fill it with sample products, customers, and orders to mimic real-world scenarios.
This sandboxed environment is absolutely essential. It’s where you can:
Safely test API calls and webhooks.
Experiment with different themes and store settings.
Break things without any consequences.
Building a Familiar User Interface with Polaris
One of the biggest factors in an app's success is how it feels to the merchant. They expect your app to look and behave like a natural part of the Shopify admin they use every day. To get that seamless experience, Shopify gives us Polaris, their official design system and React component library.
Frankly, if you're building a public app, using Polaris isn't really optional. It’s the standard.
Polaris provides a whole suite of pre-built components, everything from buttons and forms to complex data tables and navigation menus. By using these, you guarantee your app's UI is not only visually consistent with the Shopify admin but also accessible and mobile-responsive right out of the box. It saves you an unbelievable amount of time you’d otherwise sink into writing custom CSS.
The Shopify CLI starter templates come with Polaris already installed, so integrating it is a breeze. You can hit the ground running, building an interface with components merchants already recognize. This drastically cuts down their learning curve and immediately makes your app feel more professional and trustworthy.
Working with the Shopify API and Authentication
With your development environment set up, it's time to plug your app into the heart of the Shopify platform: the API. Think of the API as the nervous system connecting your app to a merchant's store; it's how you'll fetch product data, create new orders, and update customer information. Getting comfortable with how to talk to the API securely is non-negotiable for building a successful app.
This whole process is a two-way street that starts with a secure handshake. Before your app can touch a single piece of store data, the merchant has to give you explicit permission. This is all managed through OAuth 2.0, an industry-standard protocol that keeps things secure by making sure your app never has to handle sensitive store credentials directly.
Choosing Your API: GraphQL vs. REST
Shopify gives you two main APIs to work with, and picking the right one for the job can make a huge difference in your app's performance and how easy it is to build. You can absolutely mix and match them, but you need to understand their core strengths and weaknesses first.
The REST API is the old guard. It’s been around for a while and follows a traditional, endpoint-based structure. You make requests to specific URLs (like /admin/api/2024-07/products.json) to get or modify data. It's pretty straightforward and can be a solid choice for simple, single-resource operations.
Then there's the GraphQL API, which is a more modern way of doing things. It uses a single endpoint and lets you ask for exactly the data you need in one go, no more, no less. This is a game-changer because it prevents both "over-fetching" (getting way more data than you need) and "under-fetching" (having to make a dozen API calls to get all the data for one screen).
Here’s how they stack up in the real world:
Aspect | REST API | GraphQL API |
|---|---|---|
Data Fetching | You get a fixed data structure, often leading to wasted bandwidth. | You define the exact data structure needed in your query. |
Number of Requests | Often requires multiple round-trips for related data. | Fetches complex, nested data in a single request. |
Best For | Simple create, read, update, and delete (CRUD) operations. | Performance-critical apps and complex data needs. |
Developer Experience | Easy to start, but it can get messy as complexity grows. | Steeper learning curve, but far more powerful and efficient long-term. |
Let's put this into practice. Imagine you need to get a store’s first 10 products, but for each product, you also need the title and price of its first three variants. Using REST, you'd first call the products endpoint. Then, you'd have to make 10 more separate calls to get the variants for each of those products. It's slow and clunky. With GraphQL, you can build a single, elegant query to grab all of that information in one network request. It’s a massive win for performance.
The Authentication Handshake with OAuth
The OAuth flow is the official dance your app does to get permission to access a store's data. As soon as a merchant clicks that "Install app" button, Shopify kicks off a multi-step process to make sure everything is secure.
Here’s a simplified look at how it works:
Authorization Request: The merchant hits "Install app," and Shopify sends them over to your app's authorization URL.
Merchant Approval: Shopify presents the merchant with a screen listing the permissions your app is asking for. These are called scopes, and the merchant has to explicitly approve them.
Token Exchange: Once approved, Shopify sends a temporary authorization code back to your app. Your app then immediately and securely exchanges this code for a permanent access token.
This access token is your golden key. You need to store it safely and include it in every single API request you make from then on to prove your app has the right to act on the merchant's behalf. Luckily, the Shopify CLI starter template handles a lot of the boilerplate for this, but knowing what's happening under the hood is crucial for debugging when things go wrong.
The most common trap I see new developers fall into is asking for too many permissions (scopes) right out of the gate. Only ask for what your app absolutely needs to function. A merchant is far more likely to trust and install an app asking only for
read_productsthan one demandingwrite_ordersandwrite_customerswhen its main job is just to display inventory.
Requesting the Right Permissions with Scopes
Scopes define exactly what your app is allowed to do. They are granular permissions like read_products, write_orders, or read_customers. When you set your app's required scopes, you're essentially creating a contract with the merchant about what data you'll be touching.
Being specific and minimal with your scope requests is a best practice that builds immediate trust. With the number of Shopify stores in Canada showing strong growth, estimated between 107,000 to 112,507 live stores by mid-2025, it's a massive market. Canadian merchants are savvy and pay close attention to the data an app requests, making a trustworthy setup more important than ever. You can explore more insights on the Canadian Shopify ecosystem at storeleads.app.
Staying in Sync with Webhooks
Finally, let's talk about webhooks. Instead of your app constantly bothering Shopify and asking, "Is there a new order yet? How about now?", webhooks let Shopify tell you when something important happens.
You can subscribe your app to specific events, or "topics," like orders/create or products/update. When one of these events happens in a store with your app installed, Shopify sends a neat package of data (a payload) to a URL you've provided.
This is incredibly powerful for building apps that need to react in real-time. For example, an app that sends a custom email when an order is fulfilled would simply subscribe to the fulfillments/create webhook. This event-driven approach is way more efficient than constantly polling the API and is the foundation for building responsive, modern Shopify apps.
Building Your First App Feature
Alright, enough theory. It's time to roll up our sleeves and actually build something. This is the fun part, where the concepts click and you see your app start to take shape.
To keep things practical, we’re going to build a feature I’ve seen merchants ask for time and time again: a simple Product Tag Manager. The goal is to let a store owner select a bunch of products at once and add or remove tags in bulk. It’s a straightforward tool that solves a real-world annoyance, making it the perfect first project.
We'll piece together the frontend with React and Shopify's own Polaris component library, which will help us fetch and display a product list that looks right at home in the Shopify admin. On the backend, we’ll use Node.js and Express to handle the logic, connecting to the Shopify GraphQL API to actually modify the product tags. I'll walk you through every step, from managing state to making the API calls and giving the user clear feedback.

Crafting the Frontend Interface
First impressions matter. The user interface is the merchant’s only window into your app, so it needs to be clean, intuitive, and feel like it belongs in the Shopify ecosystem. This is exactly why we use React and Polaris. The Shopify CLI starter app conveniently sets these up for us, so we can jump right into building.
Our Product Tag Manager will have a simple, no-fuss layout:
A list to show the store's products.
Checkboxes beside each product for easy selection.
An input field where the merchant can type in the tag they want to use.
Two clear action buttons: "Add Tag" and "Remove Tag."
The first task is to fetch and display the products. Inside your main React component, you’ll want to use a useEffect hook. This lets you fire off an API call to your backend the moment the component loads. That call will ask your server to grab, say, the first 20 products from the store. You’ll also need useState to keep track of the loading status and to hold onto the product data once it arrives.
Thinking in components will keep your code clean. A good way to structure this is:
Main Page Component: The parent that holds the overall state, like the full product list and which products are currently selected.
ProductList Component: A "dumb" component that just renders the list of products, probably using Polaris's
ResourceList.TaggingControls Component: Another simple component that just holds the input field and the action buttons.
This kind of separation of concerns makes debugging a whole lot easier down the road. The ProductList component, for example, doesn't need to know anything about adding tags; its only job is to display data.
Writing the Backend Logic
The backend is your app's engine room. It’s where all the important work happens, like securely communicating with the Shopify API on the merchant's behalf. We'll build on the Node.js and Express server that the Shopify CLI provides to create a couple of API endpoints for our frontend to use.
We really only need two main endpoints to start:
GET /api/products: This will fetch the list of products from the Shopify store.POST /api/products/update-tags: This endpoint will handle the real work of adding or removing tags from the selected products.
For the GET endpoint, your server will take the stored access token and make a GraphQL query to the Shopify Admin API. A simple query to fetch product titles, IDs, and their existing tags looks like this:
query {
products(first: 20) {
edges {
node {
id
title
tags
}
}
}
}
The POST endpoint is where the magic happens. It will expect a list of product IDs and the specific tag to be added or removed. To make that change, you'll use a GraphQL mutation like tagsAdd or tagsRemove.
Key Takeaway: Mutations are GraphQL's way of changing data. While queries just read information, mutations are what you use to create, update, or delete anything in Shopify. Getting comfortable with them is non-negotiable for app development.
It’s a good practice to structure your backend code logically from day one. You might create a routes folder to define your API endpoints and a separate controllers folder to house the logic that actually makes the calls to the Shopify API. This discipline will make your app much easier to scale. While we're focused on a Shopify app, these principles of building scalable backend services are universal. You can explore these broader concepts in this guide on cross-platform mobile app development.
Connecting the Dots and Handling State
Now that we have the frontend and backend roughed out, we just need to get them talking. When a merchant clicks the "Add Tag" button, a function in your React component will spring into action. It will gather up the IDs of all selected products and grab the tag from the input field.
That function then makes a POST request to your /api/products/update-tags endpoint, sending along the product IDs and the tag. Your backend catches this request, performs the GraphQL mutation, and then sends back a simple success or error response. Back on the frontend, you'll use that response to show a nice success toast or a helpful error message, so the merchant always knows what’s going on.
Managing state cleanly is what makes this feel seamless. You'll rely heavily on React's useState hooks to track a few key things:
An array of the currently selected product IDs.
The current value of the tag input field.
A boolean for the loading state, so you can show a spinner while the API call is in progress.
As you build more features, a solid code review process becomes invaluable. Using tools like an ultimate code review checklist can help you maintain high standards and catch bugs before they become a headache. This habit ensures your code stays clean, efficient, and ready for whatever you decide to build next.
Getting Your App Live: Testing, Deployment, and Launch
You've built your app, and it’s working great on your local machine. Now for the exciting part: getting it out into the real world. This final leg of the journey, from your computer to the Shopify App Store, is a critical phase that separates a good idea from a great, reliable app that merchants will love.
Think of it less like a simple upload and more like a pre-flight checklist. You need to put your app through its paces, make sure every system is a go, and ensure it can handle the rigours of a live environment. Rushing this stage often leads to bad reviews and frustrated users, a hole that's tough to dig out of.

Battle-Testing in a Safe Environment
Before you even think about deploying, your app needs to be thoroughly tested. Your development store is the perfect sandbox for this. It’s a self-contained environment where you can simulate almost any merchant scenario without any real-world consequences.
A solid testing checklist is your best friend here. You'll want to cover all the bases:
Installation and Authentication: Does the OAuth flow work flawlessly every single time? What happens if a user denies a permission request midway through?
Core Functionality: Test every feature with a wide variety of data. If you've built a product tag manager, try it on products with no tags, dozens of tags, or even titles with special characters.
Theme Compatibility: Install your app on a few different development stores, each running one of Shopify’s most popular free themes, like Dawn or Sense. You're looking for UI conflicts, broken layouts, or anything that just looks off.
Edge Cases: Push your app to its limits. What happens when a merchant tries to process 1,000 products at once? What if a crucial API call fails? You need to deliberately try to break your app to find its weak spots before your users do.
Here's a pro tip from my own experience: I always create a "chaotic merchant" persona during testing. This imaginary user clicks everything, enters gibberish into forms, and uses the app in ways I never intended. If your app can survive that, it's probably ready for anything.
Deploying Your App to a Live Server
Once you’re confident that your app is stable and robust, it needs a permanent home on the internet. While your local machine is perfect for development, a production-level app needs a reliable hosting provider to run your backend code, handle API requests, and serve your frontend.
For most developers, especially those working with Node.js, two excellent options come to mind: Heroku and Fly.io. Both are well-regarded and offer free or low-cost tiers that are perfect when you're just starting.
Hosting Platform | Key Strengths | Best For |
|---|---|---|
Heroku | Incredibly simple setup and deployment, often just a | Developers who value speed and ease of use over granular control. |
Fly.io | Deploys apps in Docker containers close to users for lower latency. | Apps where performance is critical or a more custom configuration is needed. |
The choice really boils down to balancing simplicity with performance. For a first launch, Heroku’s straightforward approach is often the quickest path to getting live.
Navigating the App Store Submission Process
With your app deployed and thoroughly tested, the final gatekeeper is the Shopify App Store review team. This isn't an automated check; a real person will install and test your app against a very strict set of requirements. Getting this right is crucial, and understanding the common tripwires can save you a lot of back-and-forth. If you're trying to map out this final stage, our guide on a typical software development timeline can be a huge help.
Remember, Shopify is a massive platform. In Canada alone, it powers around 31% of the ecommerce market, with over 112,507 active stores. With such a huge user base, Shopify is understandably protective of its merchants, and its meticulous review process reflects that.
Here are some of the most common reasons for rejection:
An Unclear App Listing: Your app's purpose, features, and pricing need to be explained simply and clearly. No jargon.
Broken Core Functionality: The app absolutely must install correctly and perform its main function without any bugs.
Misleading Claims: Don’t promise features that aren’t fully baked or simply don’t exist.
A Poor User Experience: If an app is confusing or strays too far from Shopify's Polaris design guidelines, it's likely to be sent back.
And remember, launching is just the beginning. The real work starts now. Monitor your app's performance, set up error tracking, and most importantly, listen to your users. The best apps are the ones that evolve based on what merchants truly need.
Common Questions About Building Shopify Apps
Once you start digging into Shopify app development, the practical questions start popping up. What’s this actually going to cost? Which technologies should I be using? And, of course, how do I get paid? It's completely normal to have these questions, so let's walk through some of the most common ones.
Figuring this stuff out early helps you define your project's scope, set a realistic budget, and build a solid strategy from the get-go. It’s the best way to avoid common pitfalls later on.
What is the Best Tech Stack for a Shopify App?
If you're looking for the path of least resistance, the most common and well-supported stack is Node.js on the backend paired with React for the frontend. It’s no coincidence, Shopify’s own tools, including the powerful CLI we've been using, are built for this JavaScript ecosystem. This choice gives you access to the most extensive documentation, a massive community, and tons of pre-built tools that can seriously speed up your development time.
For the user interface, I can't recommend Shopify's Polaris design system enough. Using it with React isn't just about making things look nice; it ensures your app feels like a natural part of the Shopify admin. That consistency is key to building trust with merchants and delivering a seamless experience. Sure, you can use other stacks like Ruby on Rails, and they work just fine, but the JavaScript route is definitely the smoothest on-ramp for developers new to the Shopify world.
How do Shopify Apps Make Money?
Shopify has a built-in Billing API that makes monetization surprisingly straightforward. You can integrate payment models directly into your app, and most successful apps mix and match a few strategies to appeal to a wider range of merchants.
Recurring Subscriptions: This is the bread and butter for most apps. Merchants pay a predictable monthly or annual fee to use your service. It's simple and creates a steady revenue stream.
Usage-Based Pricing: This model ties the cost directly to the value a merchant gets. Think charging per order processed, per contact added, or per gigabyte of assets stored. It’s a great way to scale with your users' success.
One-Time Purchase: Less common these days, especially for apps with ongoing server costs, but a single upfront fee can work for simpler, self-contained tools.
A very effective approach is to offer tiered subscription plans (e.g., Basic, Pro, Enterprise). This lets you cater to everyone, from a solo entrepreneur just starting to a massive enterprise-level business.
How Much Does it Cost to Develop a Shopify App?
This is the big "it depends" question. The cost to develop a Shopify app can vary wildly depending on its complexity. A straightforward, single-feature app could cost anywhere from $2,000 to $10,000. On the other hand, a complex app with a highly customized UI, several third-party integrations, and a sophisticated backend can easily run from $15,000 to well over $50,000.
The final price tag really comes down to a few key things: how complex the features are, the hourly rate of the developers you hire, and how much custom design work is needed. Don't forget to budget for the long haul, too server hosting, maintenance, and customer support are all ongoing costs.
The best tool for getting a clear estimate is a detailed project scope. The more defined your vision is from the start, the more accurate your budget will be.
If your business is ready to build a Shopify app but you need an expert team to make it happen, Cleffex Digital Ltd can help. We specialise in creating custom software solutions that solve real business challenges. Visit us at https://www.cleffex.com to learn how we can support your growth.


